
Harnessing the power of TypeScript & GraphQL
GraphQL is a query language for APIs and a runtime for fulfilling those queries with your existing data. It solves many problems typically found with REST APIs. For background, see this comparison of GraphQL and REST. Combined with TypeScript, GraphQL gives you better type safety for your queries and end-to-end typing.
This chapter assumes a basic understanding of GraphQL and focuses on working with the built-in @nestjs/graphql module. The GraphQLModule can be configured to use Apollo Server (with the @nestjs/apollo driver) or Mercurius (with the @nestjs/mercurius driver). Nest provides official integrations for both packages (see also the third-party integrations below).
You can also build your own driver (see Creating a custom driver).
Installation#
Start by installing the required packages:
# For Express and Apollo (default)
$ npm i @nestjs/graphql @nestjs/apollo @apollo/server @as-integrations/express5 graphql

# For Fastify and Apollo
# npm i @nestjs/graphql @nestjs/apollo @apollo/server @as-integrations/fastify graphql

# For Fastify and Mercurius
# npm i @nestjs/graphql @nestjs/mercurius graphql mercurius
Warning@nestjs/apollov14 requires Apollo Server v5 (the@apollo/serverpackage). If you are upgrading from an older Apollo Server version, see the Apollo Server migration guide.
Overview#
Nest offers two ways of building GraphQL applications: code first and schema first. Choose the one that suits you best. Most chapters in this GraphQL section are divided into two parts: one for the code first approach and one for the schema first approach.
In the code first approach, you use decorators and TypeScript classes to generate the corresponding GraphQL schema. This approach suits you if you prefer to work exclusively in TypeScript and avoid switching between language syntaxes.
In the schema first approach, the source of truth is a set of GraphQL SDL (Schema Definition Language) files. SDL is a language-agnostic way to share schema files between platforms. Nest generates your TypeScript definitions (as classes or interfaces) from the GraphQL schemas, so you don't have to write redundant boilerplate code.
Getting started with GraphQL & TypeScript#
Hint The following chapters use the @nestjs/apollo package. To use Mercurius instead, see Mercurius integration.
Once the packages are installed, import the GraphQLModule and configure it with the forRoot() static method.
import { Module } from '@nestjs/common';
import { GraphQLModule } from '@nestjs/graphql';
import { ApolloDriver, ApolloDriverConfig } from '@nestjs/apollo';

@Module({
  imports: [
    GraphQLModule.forRoot<ApolloDriverConfig>({
      driver: ApolloDriver,
    }),
  ],
})
export class AppModule {}
Hint For the Mercurius integration, useMercuriusDriverandMercuriusDriverConfiginstead. Both are exported from the@nestjs/mercuriuspackage.
The forRoot() method takes an options object, which is passed through to the underlying driver instance (see the available settings for Apollo and Mercurius). For example, to disable the GraphQL IDE, pass the following options:
import { Module } from '@nestjs/common';
import { GraphQLModule } from '@nestjs/graphql';
import { ApolloDriver, ApolloDriverConfig } from '@nestjs/apollo';

@Module({
  imports: [
    GraphQLModule.forRoot<ApolloDriverConfig>({
      driver: ApolloDriver,
      graphiql: false,
    }),
  ],
})
export class AppModule {}
Warning Thegraphql-playgroundIDE was removed in@nestjs/graphqlv14. Theplaygroundoption remains only as a deprecated boolean alias for GraphiQL:playground: falsedisables the landing page andplayground: trueenables GraphiQL. Usegraphiqlin new code.
With the Apollo driver, these options are forwarded to the ApolloServer constructor.
Accessing the request and response objects#
The context option is a factory that builds the GraphQL execution context for each request. Use it to expose the underlying request and response objects to your resolvers:
GraphQLModule.forRoot<ApolloDriverConfig>({
  driver: ApolloDriver,
  context: ({ req, res }) => ({ req, res }),
}),
You can then read them in a resolver with the @Context() decorator:
@Query(() => String)
userAgent(@Context('req') req: Request): string {
  return req.headers['user-agent'] ?? '';
}
Hint Guards, interceptors, and other enhancers running in the GraphQL context can reach the same object via GqlExecutionContext.create(context).getContext() (see Other features).
GraphQL IDE#
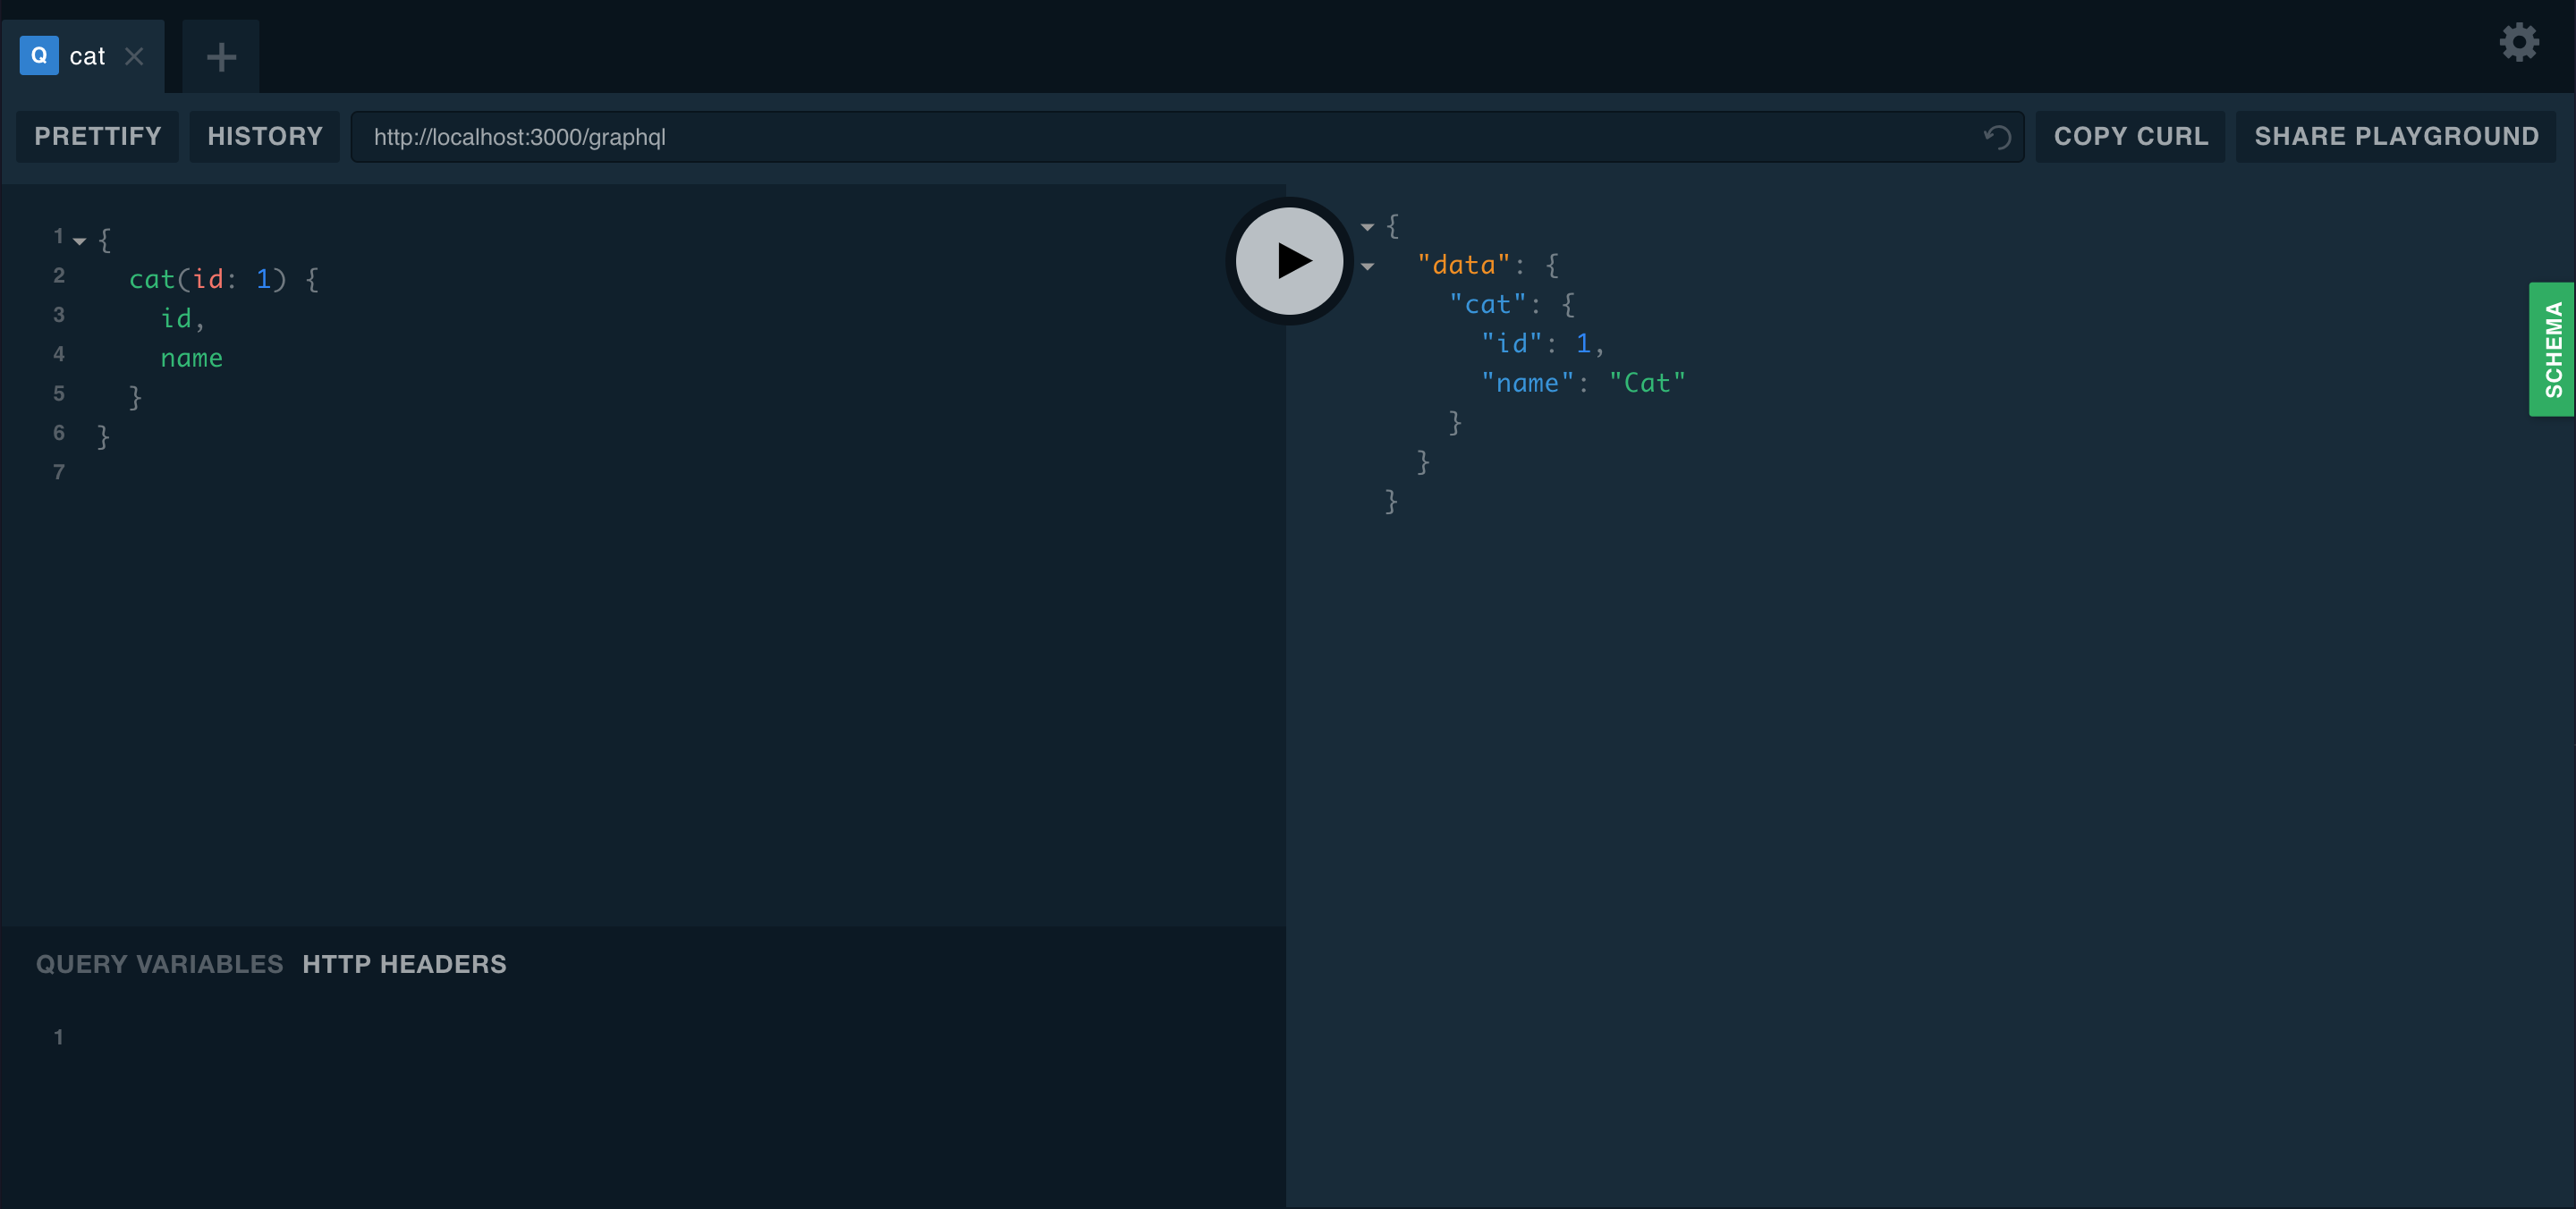
GraphiQL is the default graphical, interactive, in-browser GraphQL IDE. It is served on the same URL as the GraphQL server itself, so you need a basic GraphQL server configured and running to access it. To try it now, install and build the code first sample application. If you're following along with these code samples, GraphiQL becomes available once you've completed the steps in the Resolvers chapter.
With your application running, open your browser and navigate to http://localhost:3000/graphql (host and port may vary depending on your configuration). You will see GraphiQL, as shown below.
Note The @nestjs/mercurius integration uses GraphiQL as well.
Enabling and disabling GraphiQL#
As of @nestjs/graphql v14, GraphiQL is the only built-in GraphQL IDE; the older graphql-playground has been removed. With the Apollo driver, GraphiQL is enabled automatically whenever NODE_ENV is not production. In development, it works without any configuration; in production, the landing page is disabled by default.
To control it explicitly, use the graphiql option:
GraphQLModule.forRoot<ApolloDriverConfig>({
  driver: ApolloDriver,
  graphiql: true, // force it on, including in production
}),
GraphQLModule.forRoot<ApolloDriverConfig>({
  driver: ApolloDriver,
  graphiql: false, // disable the landing page entirely
}),
Warning Theplaygroundoption still exists, but only as a deprecated boolean alias forgraphiql. If both are set,graphiqltakes precedence. Migrateplayground: falsetographiql: falseandplayground: truetographiql: true.
Configuring GraphiQL#
To enable GraphiQL and configure it at the same time, pass an object instead of a boolean:
GraphQLModule.forRoot<ApolloDriverConfig>({
  driver: ApolloDriver,
  graphiql: {
    url: '/graphql',
    headers: {
      authorization: 'Bearer <token>',
    },
    shouldPersistHeaders: true,
    isHeadersEditorEnabled: true,
    inputValueDeprecation: false,
  },
}),
The available options are:
url | Endpoint the IDE sends operations to. Defaults to the driver's path option, so set it only when the IDE should target a different URL than the one it is served from. |
headers | Headers applied to every request, e.g., a preconfigured authorization header during development. If the headers editor is enabled and the user sets the same header, the user's value takes precedence. |
shouldPersistHeaders | Whether the contents of the headers editor are persisted in browser storage. Default: true. |
isHeadersEditorEnabled | Whether the headers editor is shown inside the editor tools. Set to false to prevent users from editing headers. Default: true. |
inputValueDeprecation | If true, schema documentation includes deprecated input fields and argument values, and introspection returns them. Default: false. |
Hint Because GraphiQL is enabled by default outside production, a common setup is to leave the default in place and set graphiql: false only for publicly reachable non-production environments where the IDE should not be exposed.
Subscriptions in the IDE#
If your application uses subscriptions, use graphql-ws. Support for subscriptions-transport-ws has been removed: it is no longer accepted as a subscriptions key, and the package is no longer a dependency.
GraphQLModule.forRoot<ApolloDriverConfig>({
  driver: ApolloDriver,
  subscriptions: {
    'graphql-ws': true,
  },
}),
GraphiQL can then execute subscription operations against your server directly.
Code first#
In the code first approach, you use decorators and TypeScript classes to generate the corresponding GraphQL schema.
To use the code first approach, start by adding the autoSchemaFile property to the options object:
GraphQLModule.forRoot<ApolloDriverConfig>({
  driver: ApolloDriver,
  autoSchemaFile: join(process.cwd(), 'src/schema.gql'),
}),
The autoSchemaFile property value is the path where the automatically generated schema is written. Alternatively, the schema can be generated on the fly in memory. To do so, set the autoSchemaFile property to true:
GraphQLModule.forRoot<ApolloDriverConfig>({
  driver: ApolloDriver,
  autoSchemaFile: true,
}),
By default, the types in the generated schema appear in the order they are defined in the included modules. To sort the schema lexicographically, set the sortSchema property to true:
GraphQLModule.forRoot<ApolloDriverConfig>({
  driver: ApolloDriver,
  autoSchemaFile: join(process.cwd(), 'src/schema.gql'),
  sortSchema: true,
}),
Example#
A fully working code first sample is available in the NestJS repository.
Schema first#
To use the schema first approach, start by adding a typePaths property to the options object. The typePaths property tells the GraphQLModule where to look for the GraphQL SDL schema definition files you'll write. These files are combined in memory, so you can split your schema into several files and keep them next to their resolvers.
GraphQLModule.forRoot<ApolloDriverConfig>({
  driver: ApolloDriver,
  typePaths: ['./**/*.graphql'],
}),
You will typically also need TypeScript definitions (classes and interfaces) that correspond to the GraphQL SDL types. Writing them by hand is redundant and tedious, and it leaves you without a single source of truth: every change to the SDL forces you to update the TypeScript definitions as well. To address this, the @nestjs/graphql package can automatically generate TypeScript definitions from the abstract syntax tree (AST). To enable this feature, add the definitions property when configuring the GraphQLModule.
GraphQLModule.forRoot<ApolloDriverConfig>({
  driver: ApolloDriver,
  typePaths: ['./**/*.graphql'],
  definitions: {
    path: join(process.cwd(), 'src/graphql.ts'),
  },
}),
The path property of the definitions object specifies where to save the generated TypeScript output. By default, all generated TypeScript types are interfaces. To generate classes instead, set the outputAs property to 'class'.
GraphQLModule.forRoot<ApolloDriverConfig>({
  driver: ApolloDriver,
  typePaths: ['./**/*.graphql'],
  definitions: {
    path: join(process.cwd(), 'src/graphql.ts'),
    outputAs: 'class',
  },
}),
This approach generates the TypeScript definitions each time the application starts. Alternatively, you can write a script that generates them on demand. For example, create the following generate-typings.ts script:
import { GraphQLDefinitionsFactory } from '@nestjs/graphql';
import { join } from 'node:path';

const definitionsFactory = new GraphQLDefinitionsFactory();
definitionsFactory.generate({
  typePaths: ['./src/**/*.graphql'],
  path: join(process.cwd(), 'src/graphql.ts'),
  outputAs: 'class',
});
Now you can run this script on demand:
$ ts-node generate-typings
Hint You can compile the script beforehand (e.g., withtsc) and usenodeto execute it.
To enable watch mode for the script (regenerating the typings whenever a .graphql file changes), pass the watch option to the generate() method.
definitionsFactory.generate({
  typePaths: ['./src/**/*.graphql'],
  path: join(process.cwd(), 'src/graphql.ts'),
  outputAs: 'class',
  watch: true,
});
To generate an additional __typename field for every object type, enable the emitTypenameField option:
definitionsFactory.generate({
  // ...
  emitTypenameField: true,
});
To generate resolvers (queries, mutations, subscriptions) as plain fields without arguments, enable the skipResolverArgs option:
definitionsFactory.generate({
  // ...
  skipResolverArgs: true,
});
To generate enums as TypeScript union types instead of regular TypeScript enums, set the enumsAsTypes option to true:
definitionsFactory.generate({
  // ...
  enumsAsTypes: true,
});
Apollo Sandbox#
To use Apollo Sandbox instead of GraphiQL as a GraphQL IDE for local development, use the following configuration:
import { ApolloDriver, ApolloDriverConfig } from '@nestjs/apollo';
import { Module } from '@nestjs/common';
import { GraphQLModule } from '@nestjs/graphql';
import { ApolloServerPluginLandingPageLocalDefault } from '@apollo/server/plugin/landingPage/default';

@Module({
  imports: [
    GraphQLModule.forRoot<ApolloDriverConfig>({
      driver: ApolloDriver,
      graphiql: false,
      plugins: [ApolloServerPluginLandingPageLocalDefault()],
    }),
  ],
})
export class AppModule {}
Example#
A fully working schema first sample is available in the NestJS repository.
Accessing generated schema#
In some circumstances, you may want a reference to the generated schema object. For example, in end-to-end tests you can then run queries with the graphql package directly, without any HTTP listeners.
You can access the generated schema (in either the code first or schema first approach) using the GraphQLSchemaHost class:
const { schema } = app.get(GraphQLSchemaHost);
Hint You must call theGraphQLSchemaHost#schemagetter after the application has been initialized (after theonModuleInithook has been triggered by either theapp.listen()orapp.init()method).
Async configuration#
When you need to pass module options asynchronously instead of statically, use the forRootAsync() method. As with most dynamic modules, Nest provides several techniques for async configuration.
One technique is to use a factory function:
GraphQLModule.forRootAsync<ApolloDriverConfig>({
  driver: ApolloDriver,
  useFactory: () => ({
    typePaths: ['./**/*.graphql'],
  }),
}),
Like other factory providers, the factory function can be async and can inject dependencies through inject.
GraphQLModule.forRootAsync<ApolloDriverConfig>({
  driver: ApolloDriver,
  imports: [ConfigModule],
  useFactory: async (configService: ConfigService) => ({
    typePaths: configService.get<string[]>('GRAPHQL_TYPE_PATHS'),
  }),
  inject: [ConfigService],
}),
Alternatively, you can configure the GraphQLModule using a class instead of a factory, as shown below:
GraphQLModule.forRootAsync<ApolloDriverConfig>({
  driver: ApolloDriver,
  useClass: GqlConfigService,
}),
The construction above instantiates GqlConfigService inside GraphQLModule and uses it to create the options object. GqlConfigService must implement the GqlOptionsFactory interface, as shown below. The GraphQLModule calls the createGqlOptions() method on the instantiated object of the supplied class.
@Injectable()
class GqlConfigService implements GqlOptionsFactory {
  createGqlOptions(): ApolloDriverConfig {
    return {
      typePaths: ['./**/*.graphql'],
    };
  }
}
To reuse an existing options provider instead of creating a private copy inside the GraphQLModule, use the useExisting syntax.
GraphQLModule.forRootAsync<ApolloDriverConfig>({
  driver: ApolloDriver,
  imports: [ConfigModule],
  useExisting: ConfigService,
}),
Mercurius integration#
Instead of Apollo, Fastify users can use the @nestjs/mercurius driver.
import { Module } from '@nestjs/common';
import { GraphQLModule } from '@nestjs/graphql';
import { MercuriusDriver, MercuriusDriverConfig } from '@nestjs/mercurius';

@Module({
  imports: [
    GraphQLModule.forRoot<MercuriusDriverConfig>({
      driver: MercuriusDriver,
      graphiql: true,
    }),
  ],
})
export class AppModule {}
Hint Once the application is running, open your browser and navigate to http://localhost:3000/graphiql to see the GraphiQL IDE.
The forRoot() method takes an options object, which is passed through to the underlying driver instance. See the Mercurius plugin options for the available settings.
Multiple endpoints#
The @nestjs/graphql module can also serve multiple endpoints at once, and you decide which modules are included in which endpoint. By default, GraphQLModule searches for resolvers throughout the whole application. To limit this scan to a subset of modules, use the include property.
GraphQLModule.forRoot<ApolloDriverConfig>({
  driver: ApolloDriver,
  include: [CatsModule],
}),
In the code first approach, the include option only determines which modules are scanned for resolvers. Types decorated with @ObjectType(), @InputType(), @InterfaceType(), @ArgsType(), or registered through registerEnumType() / createUnionType() still end up in every generated schema. To scope a type to a specific module, use the registerIn option:
@ObjectType({ registerIn: () => CatsModule })
export class Cat {
  @Field()
  name: string;
}
When a schema is built with include: [CatsModule], only types assigned to CatsModule become part of it, and types assigned to other modules are left out. Types without registerIn keep the default behavior and are available in every schema that references them.
The registerIn option is available on @InputType(), @InterfaceType(), and @ArgsType(), as well as registerEnumType() and createUnionType():
@InputType({ registerIn: () => CatsModule })
export class CreateCatInput {
  @Field()
  name: string;
}

registerEnumType(CatBreed, {
  name: 'CatBreed',
  registerIn: () => CatsModule,
});

export const CatsUnion = createUnionType({
  name: 'CatsUnion',
  types: () => [Lion, Tiger] as const,
  registerIn: () => CatsModule,
});
Hint You can pass either the module class itself or a factory function returning it. Prefer the factory form (() => CatsModule) whenever the type and the module reference each other: it defers module resolution and avoids errors caused by circular imports.
Warning If you use@apollo/serverwith the@as-integrations/fastifypackage and serve multiple GraphQL endpoints in a single application, enable thedisableHealthChecksetting in theGraphQLModuleconfiguration.
Third-party integrations#
Example#
A working Mercurius sample is available in the NestJS repository.